Monday, June 29, 2009

Kirsten Out Fishing

Kirsten enjoys the scenery near Lake Waban in Wellesley, MA.


(I took these photos last summer, and have since sold the fishing set. I just heard that the outfit doesn't come with the hat anymore. That's just ridiculous.)

Sunday, June 28, 2009

Samantha at the Cake Party

Samantha is looking sly...


Ooh, she tries to steal some goodies...


She's caught! "You're on a diet!" cry Elizabeth and Kirsten.


Is Samantha contrite?


"Ahhhh! I'm sick of the carrots you've been feeding me! Let me have those petit fours! I don't wear drop-waist dresses just for the fashion!""


(The mint green dress was made by Dollies' Dressmaker. It is one of my prized dresses.)

Saturday, June 27, 2009

Jess Spots Mr. Darcy

Mr. Darcy, why are you swimming in the pond? (Averts eyes)

This is a one-of-a-kind outfit made by Dollies' Dressmaker. I got it by Ebay auction for a pretty penny, but it was worth it. When I have time I'll take close ups of the details, especially of the spencer. It's my favorite custom doll outfit. The bonnet has grosgrain bows. The spencer has delicate lace in the back and front. I once posted a photo of this dress as part of my signature in a doll forum, and I got lots of compliments for it.

Dollie' Dressmaker Civil War Gowns

I bought these beauties from another collector. They were made by Dollies' Dressmaker. When I discovered her website, she wasn't selling the red one anymore. I saw a picture of it in the archival gallery and was hoping I would find a copy someday. Ebay hunting finally paid off!

I love the blue one even more because it matches Addy's collection so well. The brown, blue, and white contrasts are perfect. I even borrowed her snood from the Birthday Outfit and she's wearing blue boots from her extras.


I am thinking of doing a tableau from a Louisa May Alcott book or have Addy teach a class. I seem to remember my friend Rachel wrote her thesis about two teachers after the Civil War, one white and one black exchanging letters for years and years. Argh. Can't remember their names.

Thursday, June 25, 2009

Directions for Creating Doll House

After admiring beautifully constructed doll rooms for years, I finally create my own. Hopefully, you can benefit from my instructions.

I frequent message boards like American Girl Playthings and to a lesser extent American Girl Fans. Some of the board members have very detailed and beautiful room set ups. I also love the Our Dolls website, which has an amazing Victorian mansion. I have been with AGPlaythings since November 2007, so for a long time I have hoped to create a dollhouse. Thanks to my patient boyfriend, I was able to finally build one this past year. We're city folk so we don't own a car, but fortunately there is a Home Depot 15 minutes away. We bought a hand truck at the same time we bought the two particle boards, and just hauled the extremely heavy pieces home.

DOLLHOUSE INSPIRATIONS:
http://miniaturehistorian.blogspot.com/2010/02/dollhouse-inspirations.html

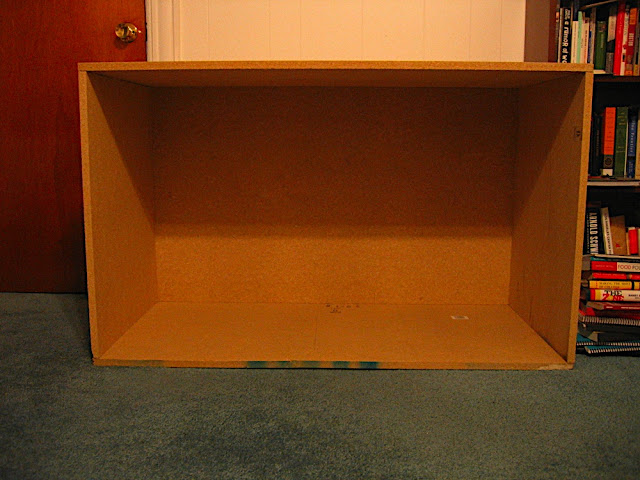
My built dollhouse, though I have some ways to go with decorating.


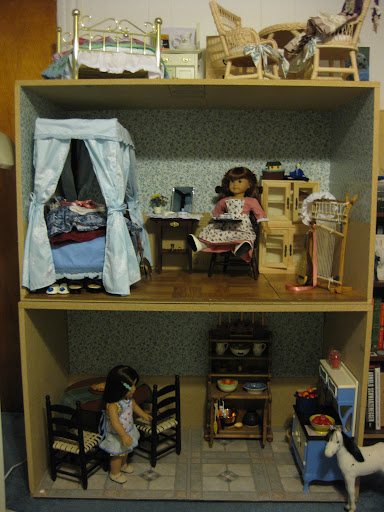
Update 2/2011, what my top floor looks like now:


what my lower floor looks like now:


WHAT YOU NEED:

(1) Power drill set (e.g. Ryobi). Make sure you buy an accessory set with the right drills and bits. We pre-drilled holes using the 1/8 drill.

(2) 50 pack of regular 1 1/2" wood screws, Philip's flat head #10.


(3) One 4 feet by 8 feet 3/4 inch particle board, costing about $20. Note that particle board is very heavy. It's made of recycled sawdust and wood chips, so it might not be suitable for kids because of the rougher edges. Feel free to experiment with other wood, but we picked particle board because it's cheap.

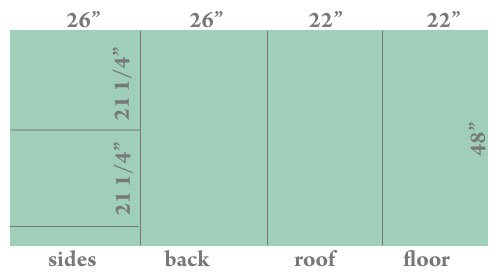
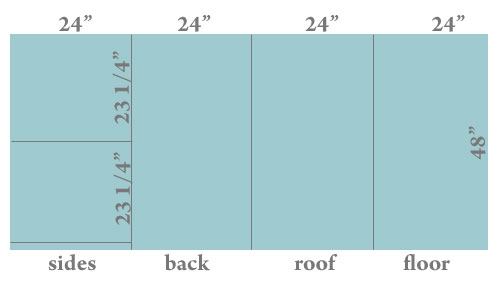
I created recommended measurements below. Because you lose 1/8 inch for each cut, make sure you ask the wood cutter to cut the side walls first (in the diagrams, left to right). Before you decide which measurement to use, make sure you measure your tallest doll furniture first. For example, the diagram for the 28" walls is what I used to fit Felicity's bed with a couple of inches to spare. Also, measure your doorways to ascertain whether the doll room can pass through.


HOW TO ASSEMBLE:

It took about 90 minutes to assemble. If you use particle board, the doll room will be very heavy. Make sure you build it near the location you intend to display it, otherwise there will be no way to move it up and down stairs without disassembling it.


Step 1.
Prop one side wall against back wall. Make sure it's vertically flushed with the floor to avoid uneven gaps later. Note: You will need an assistant to help you to hold the boards, especially to counteract the push of the drill. We used a table, chair, and dumbbell to keep everything vertical. You'll have to drill from the side which is awkward, so be very careful.
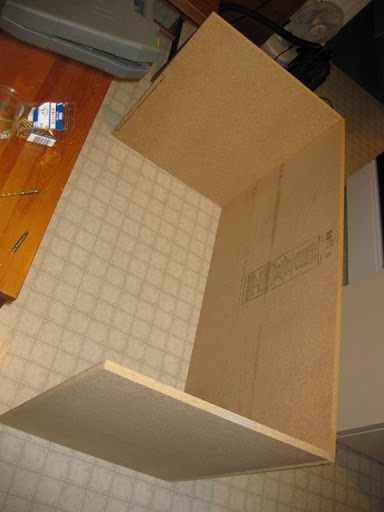

Step 2. Pre-drill with 1/8 inch drill bit. Drill in 1-1/2 inch wood screw. Repeat pre-drill and drill new screw every five inches or so. Note: Make sure you are a couple of inches away from the corner edge (see image below for example), otherwise when you put in the screw too close to the end, an entire chunk of the corner may fall off. Also, in the length that is 3/4 inch across, make sure you drill as close to center as possible.
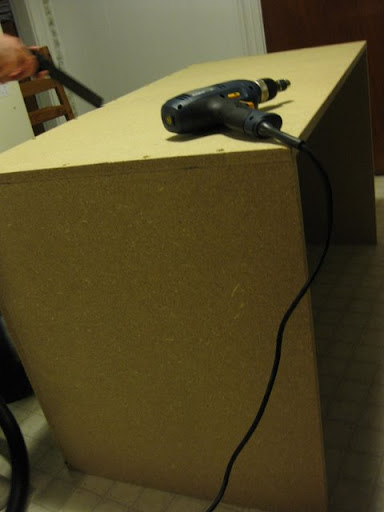

Step 3. Attach second side wall to back wall, and repeat Steps 1 and 2.

Step 4. Lay ceiling on top of walls. Make sure everything is flush. Attach ceiling in the same manner of Steps 1 and 2, except you are drilling down. You may want to vacuum some of the sawdust.

Step 5. Flip entire box and now attach floor like you did the ceiling in previous step.

Your final product should look like the image below.

Sunday, June 21, 2009

Dollhouse Inspirations

If you have carpenters in your family and a big house....


My original inspiration from Dianasmama...
American Girl Felicity Room

Saturday, June 20, 2009

The Purpose of the Miniature Historian

I've loved literature and history my entire life. As a child, I read voraciously about the American Civil War and Revolution and delved deeply into Boston history. In college, I even took the rather impractical route of majoring in history. My dream jobs\ probably would have been a historical fiction writer, a Masterpiece theater production designer for PBS, or a product developer for American Girl. But the cold hard reality is that in order to earn a decent living, I've had to become a web developer for higher ed enterprise applications. So codes, databases, and portals for me. Yes, it is strange that someone who grew up daydreaming about the past, would feel so excited about technology and gadgets. But why not? I enjoy reading about human nature and feel rather optimistic that we humans will progress to right place.

Anyway, I do enjoy my work life and my co-workers, but sometimes coding and administrative work can get a tad dry. So to reconnect with my history love, I've started this blog, which document my American Girl collecting activities.

My main goals will be to write about:

Historical Fashion, featuring unique pieces I've collected from professional seamstresses; perhaps I'll even experiment in sewing myself

Architecture, Interior Design, and Material Culture, featuring a full-scale dollhouse for 18" dolls and my quest to fill it with relatively accurate miniature historical replicas